Build an Injora SCX24 rock buggy
Build an Injora SCX24 rock buggy
Author: Andrew Brown(Youtube: Buzz Racing)
My son and I love our SCX24 crawlers and have been driving them for the last two years. This was what started my son into the RC hobby, he now drives everything under the sun that goes too fast to handle! We had put almost every accessory and upgrade on our crawlers in hopes we could crawl over everything thrown in our way. The recurring issue we struck was clearance issues with the shocks, tires and body. I kept switching to shorter shocks, but this limited the articulation of the front and rear axles. I trimmed the body and still wheel rub was an issue I could not resolve.
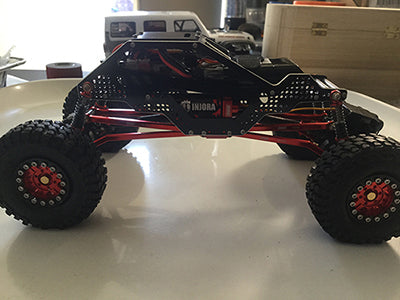
I was looking on the Injora website for a solution to this issue, and thankfully I found it. The Rock Buggy Roll Cage was exactly what I was looking for. The minimalist look works perfect for eliminating the wheel bite and clearance issues. The original body can still be attached though, whether a race class needs it, or you choose to put it back on.

After converting the chassis I noticed one issue that was impossible to shake, the front end wanted to roll over itself due to the height from the 43mm shocks, plus the front drive shaft was at its limits. The Deadbolt front 3 link suspension and driveshaft were the limitations I had to overcome. My son wanted to drive his crawler so we went down by the river to our spot in the rocks. His Jeep was doing so well compared to my Rock Buggy Roll Cage. I could tell that the longer front links were making it easier to pull the back end up over obstacles. With the new chassis I was trying I was no longer bound to the predetermined shock placement of the original chassis. I thought about adding the 3 front links from the Jeep and combining them with the Deadbolt rear links and making the wheelbase slightly longer.
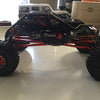
This brought me closer to what I was after. Ground clearance was no longer an issue. No more wheel bite, even better! But, the one area that was lacking was the articulation of the front axle causing me to flip over more than I had cared for. This wasn’t an issue for the rear however. When I went searching for a solution to this new issue on the Injora store I found it there again! The Injora Servo mount for the EMAX and other “oversized” micro servos. This allowed me to attach the rear 4 links of the Jeep and have them act the front links for the Rock Buggy Roll Cage. With this increase in wheelbase another driveshaft set is needed and the rear driveshaft be used as the front. The wheelbase is now extended to 155mm.

The longer wheelbase allows for this crawler to do just that. The biggest addition in my opinion would have to be the articulation from both the rear and front axles. This leads me to my build list you’ve been waiting for and the helpful advice I can offer along the way,
The Build List

To start this build I started by first taking pictures of the links and how everything looked stock as a reference point then by dismantling the vehicle till I tore it down to the shocks, links, axles, gearbox mount, driveshaft and transmission. You will need a .050” driver, a 1.5mm driver for the motor mounting screws, and the wrench you use to remove your wheels for the axle nuts as well as one more inside the transmission. I laid out the chassis, gearbox, links, shocks, axles and driveshafts side by side to see what, if anything is missing.


I personally started by attaching the Injora Emax servo mount and servo. This is done by removing the old hardware and mount and replacing with the new parts. I then added the brass steering knuckles to add some weight down low, forcing those wheels to meet the terrain in hopes of added traction. While you have your steering rod disconnected go ahead and remove the two screws on each stock knuckle and detach them. You will need to transfer over the bearings and axle piece and grab the new hardware for them. Inside you will find the screws needed for reinstallation as well as brass washers to not allow binding.

Next, I take the transmission mount, motor plate, motor, transmission cover and set them aside. I took the stock transmission cover off to remove the motor and get the gears out for the new motor plate and motor. This required me to remove the nut I described earlier ( it is the same size as the wheel nuts ) and use the 1.5mm driver for the only two screws on the motor that are not like all the others. I removed the gears, the gearbox and motor plate. I reattached the gearbox to the new Injora motor plate, then the Injora motor was attached. This was followed by the transmission cover, driveshafts and then all mounted into the transmission mount.

The next step took me the longest, it was setting up the new Injora Rock Buggy Roll Cage. It was not difficult at all, it was just getting my battery tray/esc holder in the perfect position without hitting or pinching my battery. You can use the same spots I did ( which I suggest ) but you can also choose wherever you can use them. I suggest you fully assemble half of the chassis and the whole transmission and all, this is due to clearance issues being seen as well as dealt with before everything is assembled and it feels like you’re breaking your fingers to get everything around in such a tight spot……ask me how I know.

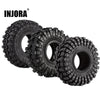
I then attached the links after adding the brass link balls and o-rings. The Jeeps rear 4 links are now your front 4 links ( thanks to the Injora Emax servo mount ) and the Deadbolt rear links are your rear. The Injora 43mm shocks are added, I attach mine upside down each time, I’ve done this for years in almost every surface rc application. I attached the axles and everything started to look like a million bucks. The wheels and tires were assembled, and upon later review I added the brass clamp rings for the wheels and they are amazing!

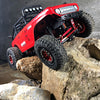
I plugged in the esc, battery, motor and servo. It passed the smell and visual test just fine, and in no time I was crawling around my living room making my son jealous enough for him to remove the transmitter from my hands. This crawler is too much fun, we are always looking for new spots to climb it on or around and it has brought the two of us even closer. Thank you for reading this and I hope you make the same decision I did.


Does this build still require a scx chassis? If so, which one. New to rock crawling and this looks amazing. Plan to make it my winter project.
Thanks
Nice build. I have the same chassis with all injora parts. I stuck to the normal wheel base and used the four link kit that’s now available. I also went for the red motor housing.
Really enjoying the setup and the fact there’s nobody clearance issues with the larger wheels and tyres. (I’m using the beadlocks and super swampers)
Super cool build! Nice break down of what you did and the part needed.
I’m impressed with the Blog and the build. Awesome job!